 1. Make a directory to host your OpenCV work:
> mkdir Vision
2. Go into that directory:
> cd Vision
3. Get all the OpenCV files from the git repository:
> git clone git://github.com/Itseez/opencv.git
> cd opencv
4. Make a directory for building OpenCV
> mkdir build
5. Go into that directory
> cd build
6. Generate a makefile specific to your environment, using cmake:
> cmake -DBUILD_SHARED_LIBS=OFF ..
7. Now build OpenCV:
> make -j8
(The very last things this builds are the jar files that we need for using OpenCV with Java. So, if the build process ever generates an “Error”, just re-enter the previous command, and let it re-start where it left off.)
8. Now we set up Eclipse to use what we’ve built. Whithin Eclipse, go to Window -> Preferences. On the left side select Java -> Build Path -> User Libraries. Then click the “New” button.
9. Name this new library “OpenCV-3.0.0” . (The version of OpenCV that I built when following the directions above was 3.0.0. If for some reason you built a different version, name the library accordingly.) Click “OK”.
10. Select your new library in the list, and click the “Add JARs” button. Find the “Vision” folder you created at the start of this tutorial, and navigate to Vision/opencv/build/bin, and select the “opencv-300.jar” file, and click “OK”.
11. Click the triangle next to that jar to expand it, select the “Native library location” entry, and click “Edit.” Click the “External Folder” button, browse to Vision/opencv/modules, highlight “java”, and click “OK”.
12. Click “OK” again to finish up, and you should now be able to create and build OpenCV projects.
Note:
* When creating a new project, be sure to add the OpenCV-3.0.0 library to the list of Libraries
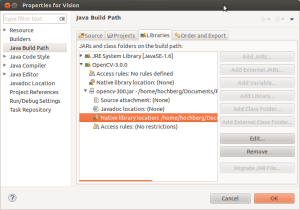
* If you already have a project, then go to Project -> Properites, select Resource -> Java Build Path, go to the Libraries tab, and add OpenCV-3.0.0 as a user library to your project.

Just a quick tip: the “-j8” on the make command in step 7 will start up 8 independent make jobs, which is great if you are running on a computer with 8 cores — but if you have fewer than 8 cores, you should probably use a smaller number (“-j4” for a 4-core processor, etc.).
Great tutorial. Thank you!
I could not find a jar file at ‘Vision/opencv/build/bin’. What could be the problem.
After the cmake step, I have to go back through the messages from cmake to check that it plans to build the Java library files. If, for some reason, it says that it is not going to, then you have to double-check that you have a JDK installed, and that the environment variables (sorry, not sure exactly which ones) are set properly. The idea is that it should know where to find *your* Java installation. Something like: JAVA_HOME=/usr/lib/jvm/java-8-oracle.
Also, as a previous commenter noted, make sure that you have ant installed…
Pingback: Trouble building opencv3.2.0 using cmake on mac os - JTuto